Animation System
So far, you have seen two ways to create animations:
Creating component interpolation animations through
item.animApplying built-in special animation effects to items through
AnimationName(item, animation_parameters)
circle = Circle()
star = Star()

self.forward()

self.play(Create(circle))
self.play(circle.anim.points.shift(LEFT * 3).scale(1.5))
self.play(circle.anim.set(color=RED, fill_alpha=0.5))

self.play(SpinInFromNothing(star))
self.play(star.anim.points.shift(RIGHT * 3).scale(1.5))
self.play(star.anim.set(color=YELLOW, fill_alpha=0.5))

self.forward()
See also:
Basic Animation Parameters
Regardless of which method is used to create animations, they all have several key parameters
duration: Animation durationMost animations have a default duration of 1 second. If you need a longer or shorter time, you can set it additionally
at: The time point when the animation startsMeans the animation will start after how many seconds from the current time. For example,
at=1, duration=2means the animation will start 1 second after the current time and last for 2 secondsThis parameter will be more practical in the “Animation Groups” content that will be discussed next
rate_func: The easing function of the animationMost animations default to interpolating in the
smooth()way, making the animation process slower at the beginning and end, faster in the middle, overall showing as a smooth transitionOther commonly used easing functions include
linear(), which makes the animation proceed at a constant speed throughout; andrush_into()rush_from(), etc. For details, please refer to the introduction in rate_functions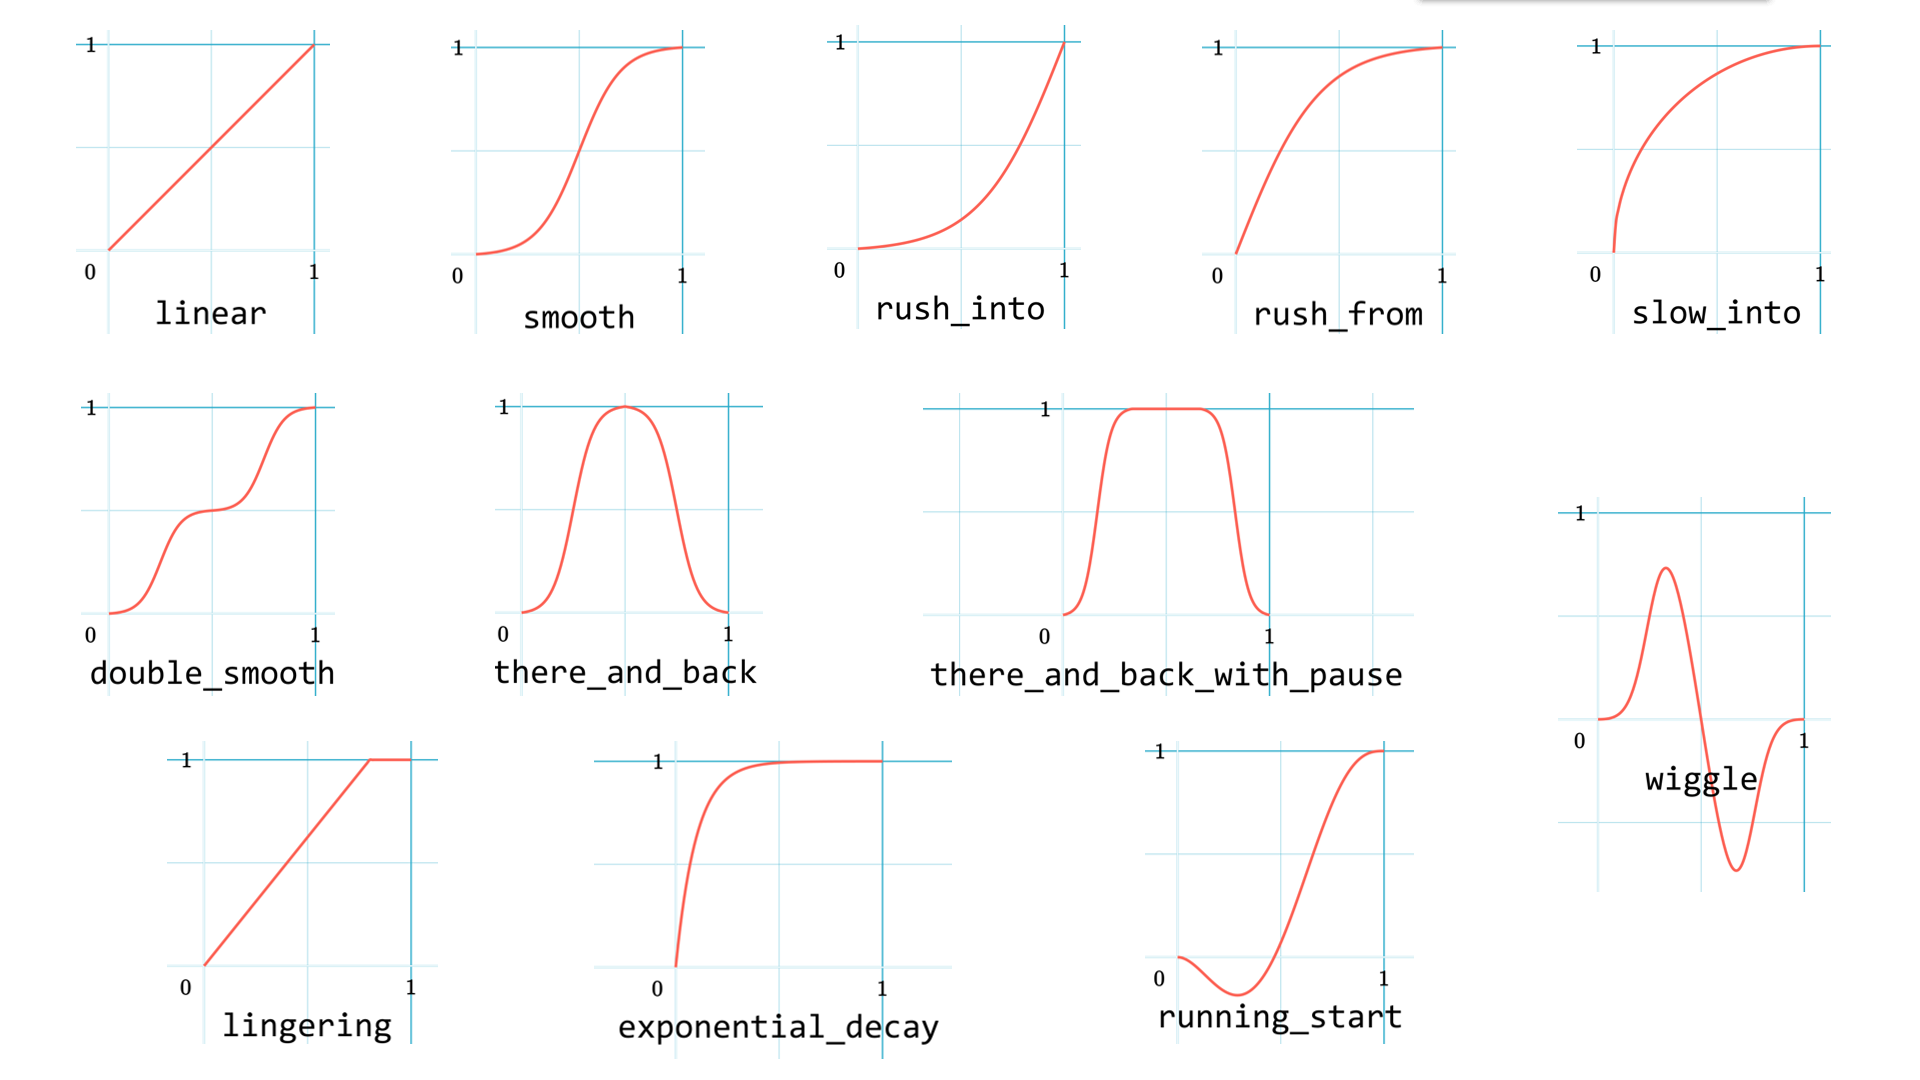
These parameters can adjust the performance details of animations. For example, duration can adjust the speed of animations and control rhythm, at can control the start timing of animations; when you want items to enter quickly and gradually slow down, you can consider using rush_into() as the easing function; in short, you can explore the use of these parameters more to achieve better animation effects.
The following is an example with some adjustments to the animation parameters above:
circle = Circle()
star = Star()

self.forward()

self.play(Create(circle, duration=0.8, rate_func=rush_from))
self.play(
    circle.anim(rate_func=ease_out_bounce)
        .points.shift(LEFT * 3).scale(1.5)
)
self.play(
    circle.anim(duration=2)
        .set(color=RED, fill_alpha=0.5)
)

self.play(SpinInFromNothing(star, duration=0.6, rate_func=rush_from))
self.play(
    star.anim(rate_func=ease_out_bounce)
        .points.shift(RIGHT * 3).scale(1.5)
)
self.play(
    star.anim(duration=2)
        .set(color=YELLOW, fill_alpha=0.5)
)

self.forward()
Changed the easing function of
CreateandSpinInFromNothingtorush_from(), and shortened their entry durationChanged the easing function of the movement animation to
ease_out_bounce(), making the item have a bouncing effect at the end of movementChanged the color-changing animation duration to 2 seconds
Tip
You can change animation parameters by adding parentheses after .anim and filling in parameters.
Adding line breaks in appropriate places can optimize code readability, especially when animation calls are long.
Animation Groups
Animations are not limited to executing individually and sequentially as above. We can also make multiple animations execute together to create richer animation effects.
First, the most basic: animations placed in the same self.play function will execute together. You can also pass at parameters to animations separately to control their start timing:
circle = Circle()
circle.points.to_border(UL, buff=LARGE_BUFF)

square = Square()
square.points.to_border(DL, buff=LARGE_BUFF)

self.play(
    FadeIn(circle),
    FadeIn(square)
)
self.play(
    circle.anim
        .points.to_border(UR, buff=LARGE_BUFF),
    square.anim(at=0.2)
        .points.to_border(DR, buff=LARGE_BUFF)
)
See also:
You can also use AnimGroup, Succession, and similar classes to compose multiple animations.
Among them,
AnimGroupsimply composes multiple animations together and can uniformly apply parameters such asatanddurationAnimGroupwill scale the internal animation structure as a whole according to thedurationparameter to match the durationSuccessionwill chain multiple animations together, starting the next animation after the previous one ends
circle = Circle()
circle.points.to_border(UL, buff=LARGE_BUFF)

square = Square()
square.points.to_border(DL, buff=LARGE_BUFF)

self.play(
    FadeIn(circle),
    FadeIn(square)
)
self.play(
    Succession(
        circle.anim(rate_func=rush_into)
            .points.to_border(UR, buff=LARGE_BUFF),
        square.anim(rate_func=rush_from)
            .points.to_border(DR, buff=LARGE_BUFF),
        duration=3
    ),
    AnimGroup(
        ShowCreationThenDestructionAround(circle),
        ShowCreationThenDestructionAround(square),
        at=0.5,
        duration=2
    )
)

Hint
In fact, the self.play function itself acts as a AnimGroup, so you can directly place multiple animations in self.play and apply parameters such as at and duration.
Note
For more information about animation groups, refer to the introduction in composition, which also mentions the use of lag_ratio and offset parameters, which will not be expanded here.
Preparing Animations
When we use self.play to play an animation that lasts 4 seconds, the current time will jump to 4 seconds later, but we lose the opportunity to create other animations during these 4 seconds, because we can only move forward and not backward.
Therefore, JAnim provides a practical feature - preparing animations in advance without advancing in time, which can be done by calling self.prepare:
txt = Text('JAnim')
txt.points.shift(LEFT * 2)

self.prepare(
    CircleIndicate(txt),
    at=1,
    duration=2
)

self.play(txt.anim.points.shift(RIGHT * 4).scale(2), duration=2)
self.play(txt.anim.points.shift(LEFT * 4).scale(0.5), duration=2)
See also:

In this example, we use self.prepare to pre-set a CircleIndicate animation, so that in the subsequent movement animation of the text, we can see the yellow circle highlighting effect during the pre-set time period.
Note
In principle, play is actually a combination of prepare + forward.
Animation Sequence Control
In the animation sequence of Succession, we can insert some additional controls, for example:
Using
Waitto insert waiting timeUsing
Doto execute specified operations at specific times in the animation sequence
dot = Dot(RIGHT * 2).show()
txt = Text('just a dot').show()
txt.points.next_to(dot, DOWN)

star = Star(start_angle=0, outer_radius=2)
star.points.shift(dot.points.box.center - star.points.get()[0])

txt1 = Text('Rotating...', font_size=60, color=GREY_D, depth=1)
txt2 = Text('Drawing a star!', font_size=60, color=GREY_D, depth=1)

self.forward()
self.play(
    Aligned(
        Succession(
            Do(txt1.show),
            Rotate(dot, TAU, about_point=ORIGIN, duration=2),
            Do(txt1.hide),
            Wait(0.5),
            Do(txt2.show),
            AnimGroup(
                MoveAlongPath(dot, star),
                Create(star, auto_close_path=False),
                duration=2
            ),
            Do(txt2.hide)
        ),
        Follow(txt, dot, DOWN)
    )
)
self.forward()
See also:

Built-in Animations
For more available built-in animations, refer to the following list:
JAnim also has an important feature called “animation combination”, which we will detail in Updater Usage.
Usage of .r
In JAnim, due to the item-component structural relationship, after completing operations in a component, you need to use .r to return to the item level, so as to access item or other component functions, for example:
item.points.shift(LEFT * 2).r.color.fade(0.5)
Or for animations
self.play(
    item.anim.points.shift(LEFT * 2).r.color.fade(0.5)
)