Installation
Important
JAnim is an animation library that runs on Python 3.12 and higher. Creating animations with JAnim requires writing Python programs, so users need to have some understanding of programming
Steps
Installing JAnim
When installing JAnim, external dependencies are not required, so we can install JAnim directly and install dependencies as needed.
Developers familiar with Python libraries can choose appropriate installation methods. Overall, there are two installation approaches, each with advantages:
Installing globally allows all projects to use the same library, and commands can be called directly without switching environments and directories first;
Installing in a virtual environment provides dependency isolation between projects and does not pollute global commands.
Since subsequent operations will more or less involve command-line operations, we hope you have some understanding of the command line
Click to expand brief instructions on opening the command line
Here we briefly introduce how to open the command line, and will not mention it again later. On Windows, it is recommended to use the built-in PowerShell. ❶ A simple way to open it is to press “Win logo key + R” to open the “Run” window, enter powershell (PowerShell 7.x requires entering pwsh), ❷ you can also enter “powershell” in the Start menu and press Enter, or ❸ press ctrl + ` in VS Code. On macOS / Linux, generally right-click to select “Terminal” or find the built-in terminal icon.
The following briefly introduces several common installation methods:
uv is a toolchain for Python project management, currently relatively mature, and convenient for developers who frequently use multiple Python versions and multiple dependency libraries. The official provides many installation methods, which can be installed using the package managers mentioned above, or installed independently.
Note
This entry borrows from the ManimCE project’s installation documentation, command-line installation of uv and further commands for creating new projects can refer to the corresponding paragraphs therein.
If you are not yet familiar with using uv and are slightly confused, you can click on the “Python + Global” tab above to switch to a more classic installation method, which you may find easier to understand, but we still recommend using uv for management.
This section introduces how to create independent virtual environments under each folder. If you are at an appropriate file path (referred to as /my/path below) and want to develop in a folder called “JAnim-folder”, please run the following commands line by line, which will automatically create “JAnim-folder” and create a virtual environment in it.
cd "/my/path"
uv init "JAnim-folder"
cd "JAnim-folder"
uv add janim[gui]
uv run janim --version  # If you see the version number, the installation is complete
After installing in this way, all janim commands in the documentation should be replaced with uv run janim. If you still want to call janim directly, you need to first activate the virtual environment, which is for the purpose of isolating global and project-specific environments.
Tip
Once everything is ready, you can use uv run janim examples to view built-in examples and further verify the JAnim installation
uv is a toolchain for Python project management, currently relatively mature, and convenient for developers who frequently use multiple Python versions and multiple dependency libraries. The official provides many installation methods, which can be installed using the package managers mentioned above, or installed independently.
Note
This entry borrows from the ManimCE project’s installation documentation, command-line installation of uv and further commands for creating new projects can refer to the corresponding paragraphs therein.
If you are not yet familiar with using uv and are slightly confused, you can click on the “Python + Global” tab above to switch to a more classic installation method, which you may find easier to understand, but we still recommend using uv for management.
Unlike installation in a virtual environment, global installation does not require specifying a folder for project development.
uv tool install janim[gui]
janim --version     # If you see the version number, the installation is complete
Tip
Once everything is ready, you can use janim examples to view built-in examples and further verify the JAnim installation
Python can be installed directly, and multiple versions can coexist. Visit the Python official download page and select version 3.12 or higher to download and install.
Using Python’s built-in pip tool will automatically install dependencies globally. Open the command line and enter this command:
pip install janim[gui]
janim --version     # If you see the version number, the installation is complete
Tip
Once everything is ready, you can use janim examples to view built-in examples and further verify the JAnim installation
To be improved, contributions welcome
Installing Optional Dependencies
To output video files or process audio/video, you need to install FFmpeg.
However, it is worth noting that previewing animations via the GUI does not depend on FFmpeg; it is only required when finally exporting video. Therefore, you can start experimenting with JAnim right away and install FFmpeg later when you need to render output.
For typesetting formulas or advanced text formatting, JAnim uses Typst.
Typst is already integrated into JAnim (via the typst-py package), so no additional installation is required. However, if you prefer to use an external Typst executable, instructions for doing so are provided below.
For Linux, you may also need to install
portaudio19-devadditionally. For details, see the Linux section below.
Package management on Windows systems is not necessarily ready to use out of the box. It usually requires some familiarity with command-line operations and a small amount of configuration. This configuration process is relatively time-consuming, but once configured, it can automatically handle many trivial tasks. The author recommends using a package manager here.
There are many choices for package managers. Generally, Windows should come with Winget built-in. You can also use Chocolatey or Scoop. You only need to install one of the three, though installing multiple won’t cause conflicts.
After installing the package manager (or using the built-in Winget), taking Winget as an example, press Win + R and enter powershell, or enter powershell in the Start menu to open PowerShell, then enter winget install typst and winget install ffmpeg to complete the installation. The other two are similar.
Tip
If you are not familiar with the command line and prefer a graphical interface, you can also install UniGetUI to provide a unified display and invocation of package managers. Note that it is only a graphical interface for package managers and still requires the corresponding package manager to exist in the environment to use.
Directly downloading binary files requires fewer steps, but you need to manually handle installation location, adding environment variables, and updating binaries.
First, install FFmpeg. Click https://www.gyan.dev/ffmpeg/builds/ffmpeg-git-full.7z to download the archive, extract it, move the folder starting with ffmpeg- to an appropriate location (e.g., C:\\Program Files), and rename the folder to ffmpeg.
Then install Typst. Click https://github.com/typst/typst/releases/latest/download/typst-x86_64-pc-windows-msvc.zip to download the archive (if there’s a network error, try several times), extract it, move typst-x86_64-pc-windows-msvc to an appropriate location, and rename the folder to typst.
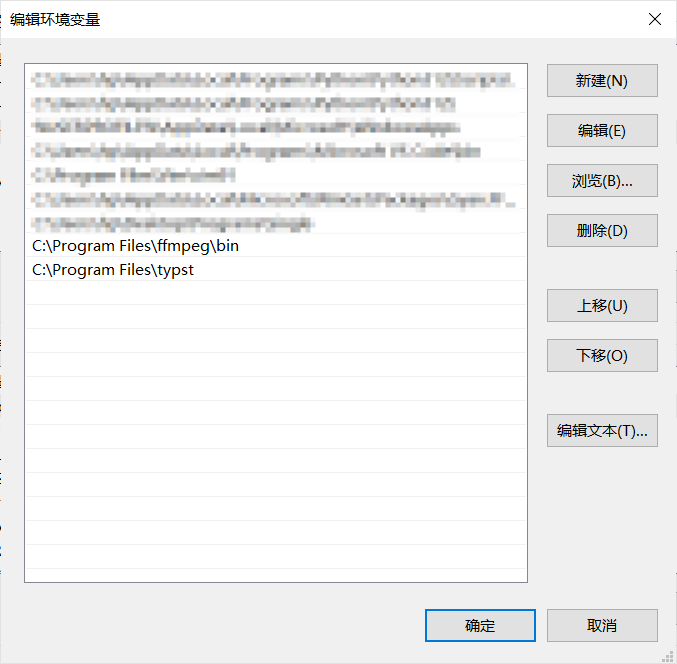
Finally, add environment variables. If using Windows 11, press the “Windows” logo key or click the “Start” button and enter “environment variables”. (For earlier versions, right-click This PC - Properties - Advanced System Settings). Click “Environment Variables”, double-click “Path” under “User variables” (or “System variables”, choose either), right-click the typst folder and “Copy file address”, click “New” in the Path window (as shown below) and paste the file address (note: do not include quotes). Similarly, paste the file address of ffmpeg\bin, i.e., the bin folder under the ffmpeg folder you just obtained.
Test if they are correctly recognized. Enter and open PowerShell or Cmd from the Start menu, run ffmpeg --version and typst --version. If version numbers are output, the installation is successful.
It is recommended to install using a package manager. Here we use the common Homebrew as an example.
Homebrew is the most commonly used package manager on macOS. Use the following command to install it (if you already have it installed, you can skip this):
/bin/bash -c "$(curl -fsSL https://raw.githubusercontent.com/Homebrew/install/HEAD/install.sh)"
Then you can use Homebrew to install FFmpeg and Typst
# FFmpeg
brew install ffmpeg
ffmpeg --version    # If the version number is output, the installation is successful

# Typst
brew install typst
typst --version     # If the version number is output, the installation is successful
Considering that users of Unix-like systems generally have better understanding of the command line, and there are many corresponding distributions with no universal package management commands, only Ubuntu’s installation method is provided here.
Open the terminal and run the following commands. FFmpeg is installed using the package manager. Different distributions have different package managers, please adapt accordingly.
# FFmpeg
sudo apt update
sudo apt install ffmpeg
ffmpeg --version    # If the version number is output, the installation is successful
Since Typst is relatively new and has not entered a stable version, download and install it directly from the source repository.
# Typst (Based on https://lindevs.com/install-typst-on-ubuntu)
wget -qO typst.tar.xz https://github.com/typst/typst/releases/latest/download/typst-x86_64-unknown-linux-musl.tar.xz
sudo tar xf typst.tar.xz --strip-components=1 -C /usr/local/bin typst-x86_64-unknown-linux-musl/typst
typst --version     # If the version number is output, the installation is successful
rm -rf typst.tar.xz
Additionally, using JAnim window preview for audio on Linux may also require installing portaudio:
# portaudio
sudo apt install portaudio19-dev
The author has only tried the above installation on one virtual machine and cannot guarantee it will work in real environments. Network fluctuations, missing local commands, file name conflicts, and other reasons may cause installation failures. If you encounter installation issues, please report them promptly on GitHub or in group chat with error messages and/or screenshots.
Possible Issues
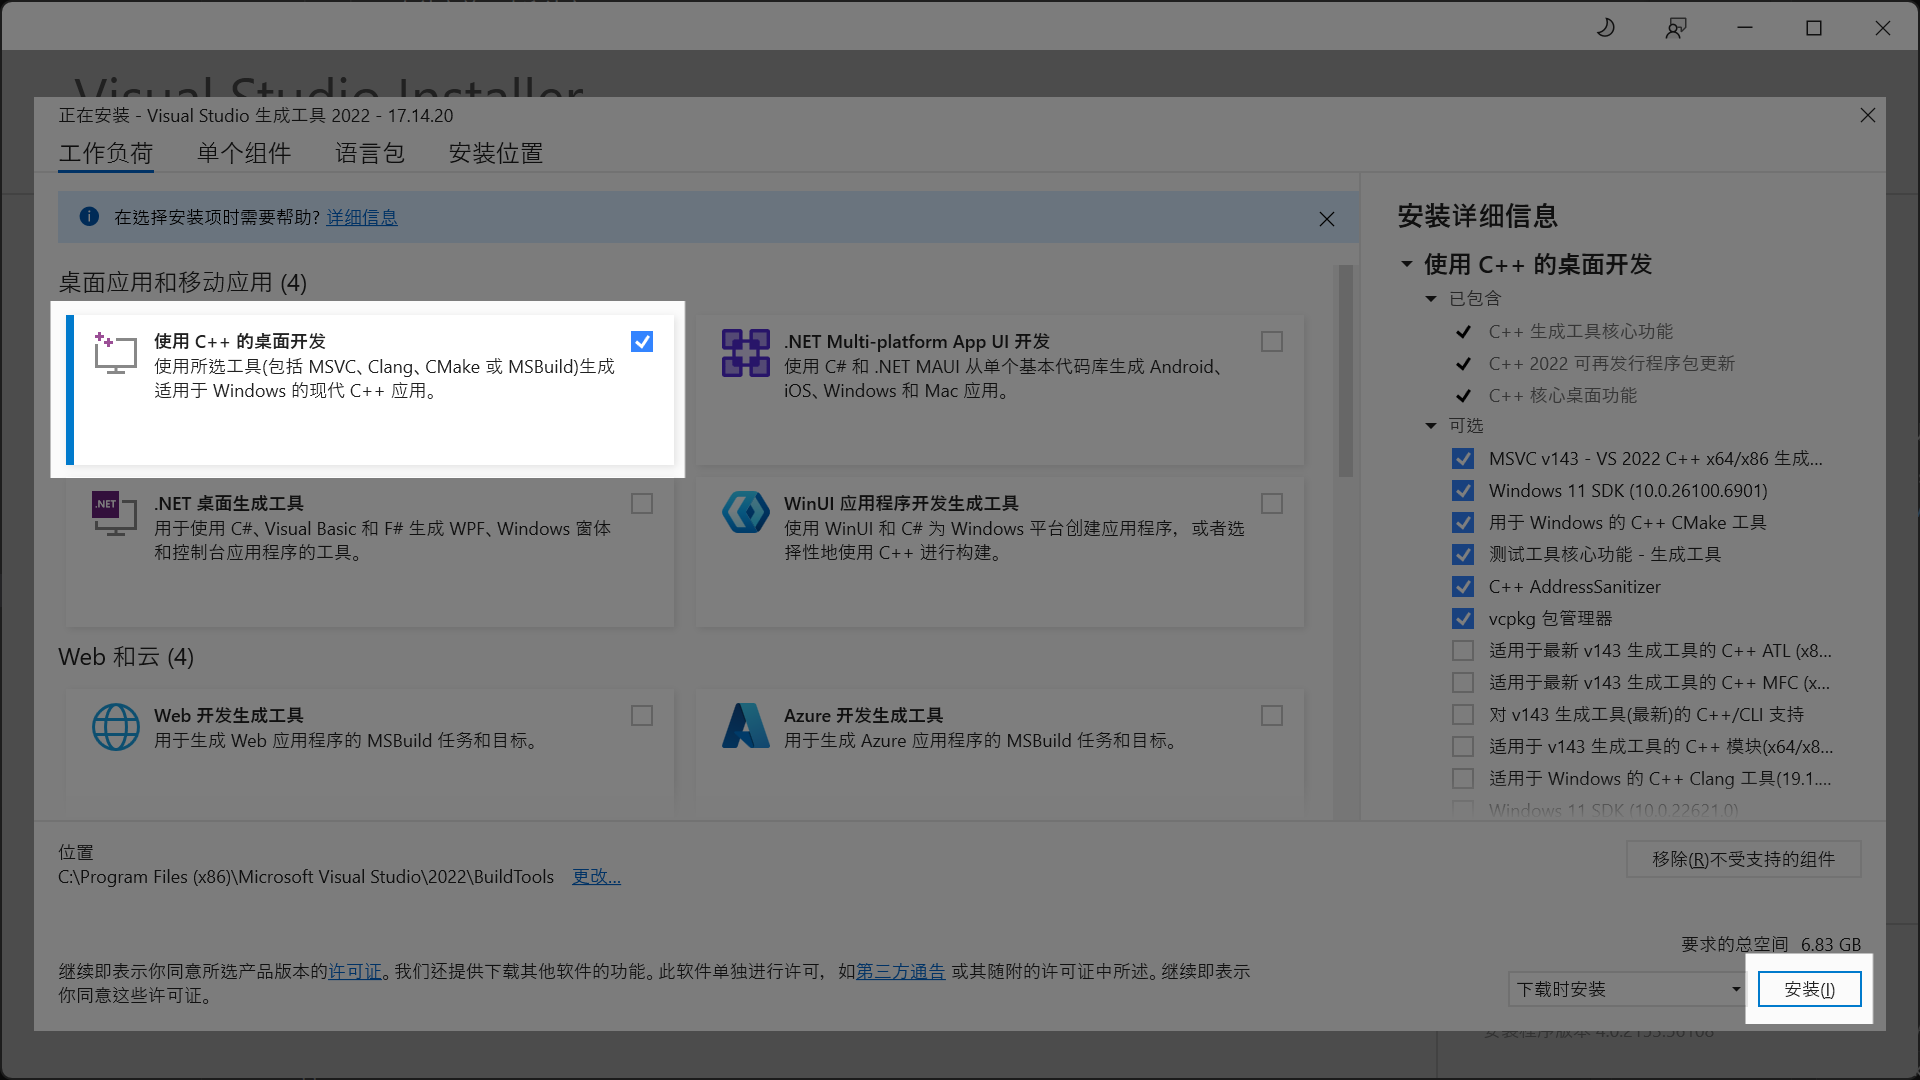
Microsoft Visual C++ 14.0 or greater is required.
During installation, the glcontext package shows the following error:
error: Microsoft Visual C++ 14.0 or greater is required. Get it with "Microsoft C++ Build Tools":
https://visualstudio.microsoft.com/visual-cpp-build-tools/
Simply follow the link it provides https://visualstudio.microsoft.com/visual-cpp-build-tools/ to download and install.
When installing components, check “Desktop development with C++” and click the install button, as shown in the figure below
After installation is complete, try installing JAnim again.
If it still fails, you can try restarting the terminal, editor, or computer and try again.
Installing VS Code
It is recommended to use VS Code for development, which allows the janim-toolbox plugin to make using JAnim more convenient
For details, refer to the introduction in VS Code Extension
Tip
Please click the button at the bottom right of the page to proceed to the next section. This reminder will not appear in subsequent sections.