3D Scene
In JAnim, each coordinate has three components [x, y, z]. In the two-dimensional scenes we used before, we only needed the first two components. Once we enter a 3D scene, the third component comes into play
Before that, we should first understand camera rotation in 3D space to make observation easier; after that, we will further expand on 3D scenes.
Rotating the Camera in 3D Space
In Using the Camera, we used the rotate() method to rotate the camera
This method also has an axis parameter, which specifies the axis of rotation. Its default value is OUT, in which case the camera only rotates within the 2D plane
If we change this parameter, we can rotate the camera in 3D space and present a 3D view:
# Main elements in the scene: a 3D axes and a square in the 2D plane

axes = ThreeDAxes(
    (-4, 4), (-4, 4), (-4, 4),
    axis_config={
        'include_tip': True
    }
)
square = Square()

# Arrow and text used for demonstration

vec1 = Vector(RIGHT, color=YELLOW)
vec2 = Vector(OUT, color=YELLOW)

txt1 = Text('axis=RIGHT', font_size=16, color=YELLOW)
txt1.points.next_to(vec1, UR, buff=SMALL_BUFF)
txt2 = Text('axis=OUT', font_size=16, color=YELLOW)
txt2.points.next_to(vec2, OUT, buff=SMALL_BUFF)

group1 = Group(vec1, txt1)
group2 = Group(vec2, txt2)

# Animation process

self.show(axes, square)

self.play(FadeIn(group1))
self.play(
    self.camera.anim.points.rotate(30 * DEGREES, axis=RIGHT),
)
self.play(FadeOut(group1))

self.play(FadeIn(group2))
self.play(
    self.camera.anim.points.rotate(40 * DEGREES, axis=OUT),
)
self.play(FadeOut(group2))
See also:
Also, we can use absolute=False to indicate rotation based on the camera’s own coordinate system:
axes = ThreeDAxes(
    (-4, 4), (-4, 4), (-4, 4),
    axis_config={
        'include_tip': True
    }
)
square = Square()

self.show(axes, square)
self.play(
    self.camera.anim.points
        .rotate(30 * DEGREES, axis=RIGHT)
        .rotate(40 * DEGREES, axis=OUT),
    duration=2
)
self.show(FrameRect(self.camera, alpha=0.5))  # Show the current camera viewport frame
self.forward(0.5)

# Rotate based on the camera's own coordinate system
self.play(
    self.camera.anim.points
        .rotate(20 * DEGREES, absolute=False)
)
self.forward()
See also:
You can also directly use a quaternion to specify the viewing orientation:
axes = ThreeDAxes()
sphere = Sphere().into('checker')
sphere.points.move_to(axes.c2p(3, 2, 2))

self.show(axes, sphere)

self.forward()
self.play(
    self.camera.anim.set(orientation=quat(0.8, 0.2, 0.1, 0.9))
)
See also:
Note
JAnim GUI also provides a convenient feature for adjusting the camera in the preview window; see camera Command for details
3D Coordinates
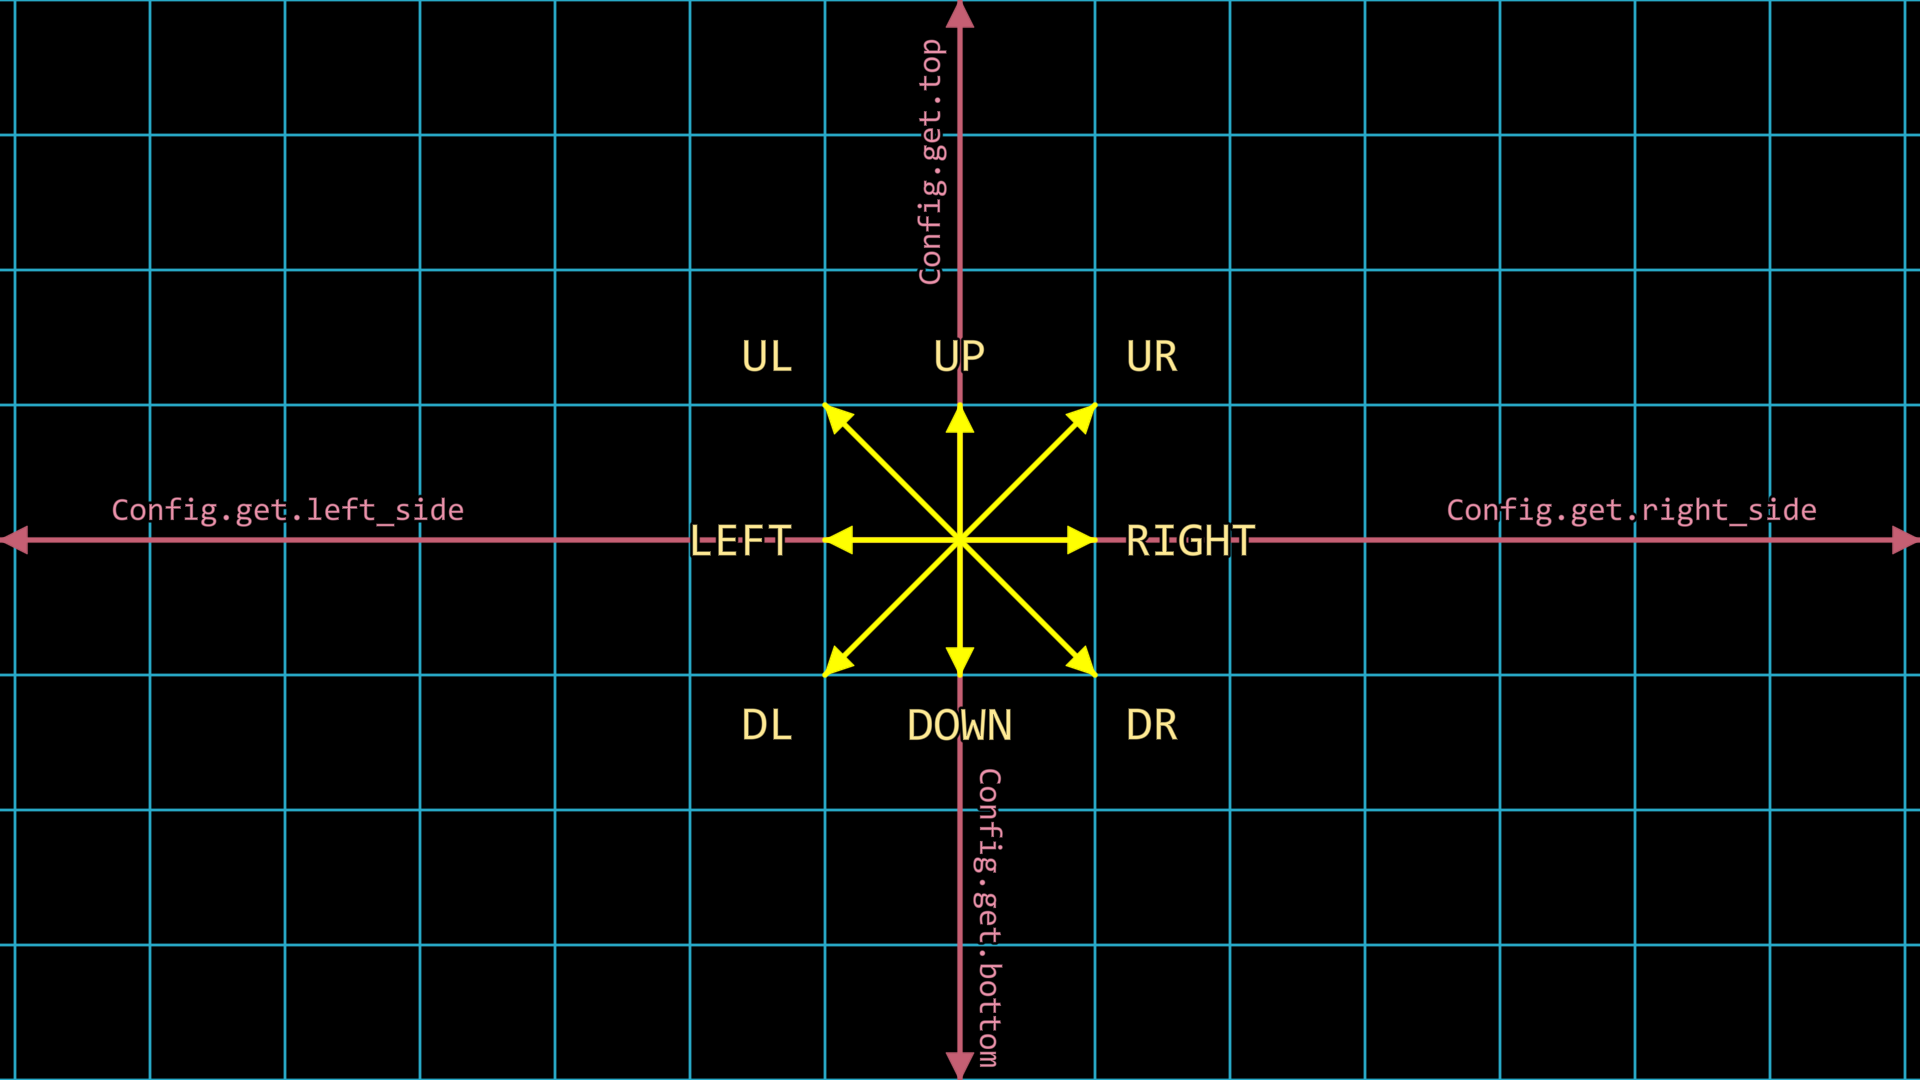
Looking back at the following image, in planar coordinates we mentioned several main directions, including LEFT, RIGHT, DOWN, and UP
In 3D space, there are two more main directions along the third component: OUT and IN. They represent the directions of leaving the 2D plane (that is, toward the initial camera) and going into the 2D plane (that is, away from the initial camera), as shown below:
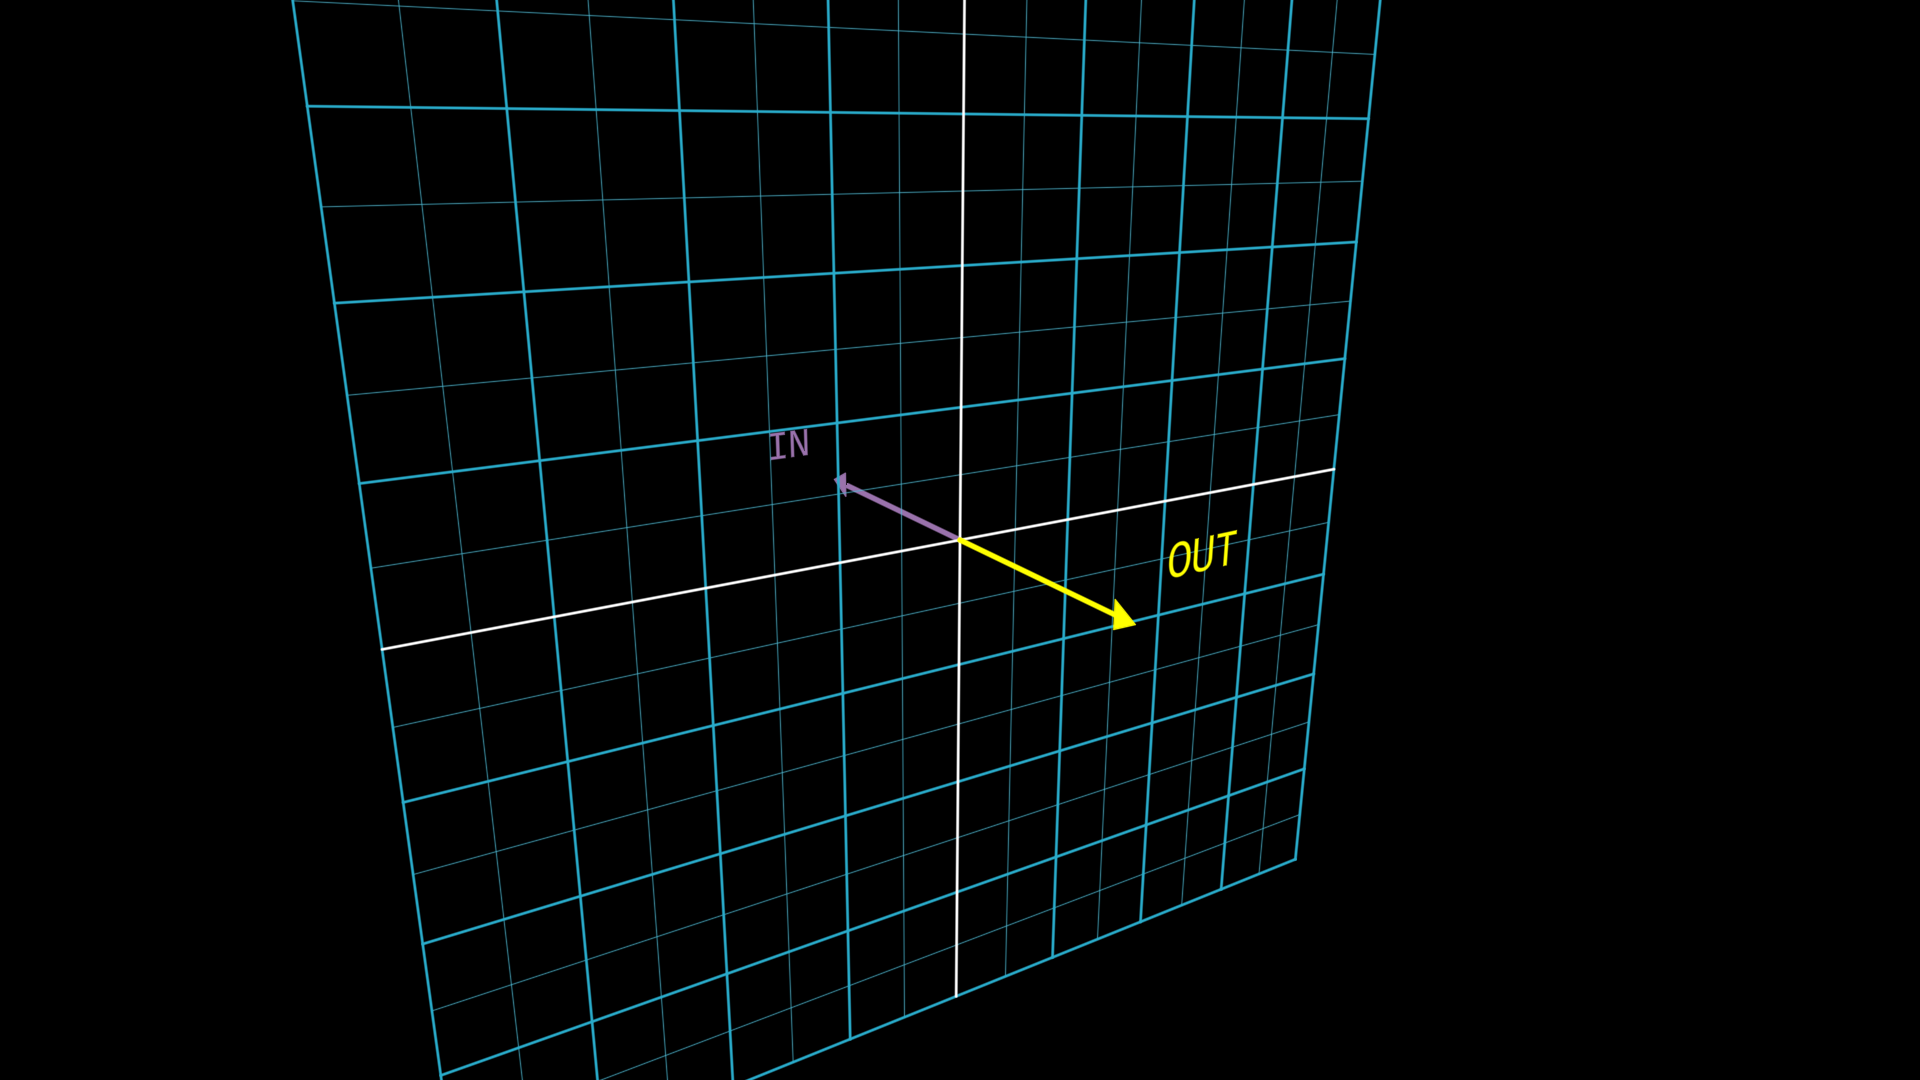
Therefore, we can use these two directions to move in 3D space; of course, we can also rotate in 3D space
self.camera.points.set(orientation=quat(-0.15, -0.28, -0.04, 0.95))

# Coordinate system used for observation

axes = ThreeDAxes(
    (-3, 3), (-3, 3), (-3, 3),
    axis_config={
        'include_tip': True,
    }
)
axes.z_axis.set(color=MAROON)
labels = axes.get_axis_labels(rotate_xy=False, z_kwargs={'color': MAROON})

# Rectangle item used for demonstration

square = Square(color=BLUE, fill_alpha=0.6)

# Animation process

Group(axes, labels, square).show().apply_depth_test()
self.forward()
self.play(
    square.anim(duration=1.5).points.shift(OUT * 2),
    square.anim(duration=3).points.shift(IN * 4),
    Rotate(square, PI, axis=RIGHT, about_point=ORIGIN, duration=3),
    lag_ratio=1
)
self.forward()
See also:
In addition to using built-in directions to represent coordinates, you can also directly use coordinate values to represent positions. For example, the .shift(OUT * 2) above is equivalent to .shift([0, 0, 2]).
Handling 3D Occlusion
By default, JAnim only draws items according to their depth order, but for occlusion between items in 3D space, we need some other mechanisms
Mechanisms for handling occlusion in 3D space can be divided into two types:
apply_depth_test(): Depth testingDuring rendering, pixel-level occlusion of items with this mechanism enabled is handled automatically; already-occluded pixels are not rendered, with almost no performance cost
For the underlying principle, you can search online for information about “depth testing” or “depth buffering”
apply_distance_sort(): Distance sortingDuring rendering, the distance from each item’s center to the current camera is calculated for items with this mechanism enabled, and the render order is sorted by distance, which incurs a sorting performance cost
We need to understand the pros and cons of these mechanisms so that we can choose the appropriate one. When considering their advantages and disadvantages, there are two difficult scenarios to keep in mind:
“Intersecting Items” and “Semi-transparent Items”
Demonstration:
class ThreeDOcclusion(Timeline):
    def construct(self) -> None:
        # Initial view
        self.camera.points.rotate(20 * DEGREES, axis=RIGHT).rotate(35 * DEGREES, axis=OUT)

        # Demonstrate two strategies
        self.demonstrate(depth_test=True, distance_sort=False)
        self.demonstrate(depth_test=False, distance_sort=True)

    def demonstrate(self, depth_test: bool, distance_sort: bool) -> None:
        txt1 = Text(f'{depth_test=}').fix_in_frame()
        txt1.points.next_to(LEFT * 1.5, LEFT)
        txt2 = Text(f'{distance_sort=}').fix_in_frame()
        txt2.points.next_to(RIGHT * 1.5, RIGHT)

        for txt in [txt1, txt2]:
            txt.select_parts('True').set(color=GREEN)
            txt.select_parts('False').set(color=RED)
        self.show(txt1, txt2)

        # Intersecting items demo

        s1 = Square(color=RED, fill_alpha=1)
        s2 = Square(color=GREEN, fill_alpha=1)
        s2.points.rotate(PI / 2, axis=RIGHT)
        s3 = Square(color=BLUE, fill_alpha=1)
        s3.points.rotate(PI / 2, axis=UP)

        group = Group(s1, s2, s3)
        group.apply_depth_test(depth_test)
        group.apply_distance_sort(distance_sort)

        self.show(group)
        self.play(self.RotatingCamera(), duration=5)
        self.hide(group)

        # Semi-transparent items demo

        sphere = Sphere(resolution=12, fill_alpha=0.5).into('vchecker')

        sphere.apply_depth_test(depth_test)
        sphere.apply_distance_sort(distance_sort)

        self.show(sphere)
        self.play(self.RotatingCamera(), duration=5)
        self.hide(sphere)

        self.hide(txt1, txt2)

    def RotatingCamera(self):
        return AnimGroup(
            DataUpdater(
                self.camera,
                lambda data, p: data.points.rotate(TAU * p.alpha, axis=RIGHT),
            ),
            DataUpdater(
                self.camera,
                lambda data, p: data.points.rotate(TAU * p.alpha, axis=OUT),
            ),
        )
See also:
Note that:
Depth testing performs better when handling intersecting items, but it does not handle semi-transparent items well; the visibility of semi-transparent items is affected by render order
Also, if you look closely, you may notice thin black edges after enabling depth testing. This is caused by anti-aliasing, which makes edge pixels semi-transparent
Distance sorting performs better when handling semi-transparent items, but it does not handle intersecting items well and cannot correctly process pixel-level occlusion
So you can see that the hardest case is:
“Semi-transparent Intersecting Items”
As a less elegant workaround, you might consider manually subdividing item surfaces, etc.; we will not discuss that here in detail