三维场景
在 JAnim 中,每个坐标都有三个分量 [x, y, z] ,在我们之前接触的二维场景中,我们只需要用到其中的前两个分量,当我们进入三维场景后,第三个分量就会发挥作用
在这之前,我们要先了解一下在三维空间中的摄像机旋转,以方便我们观察;在了解了摄像机旋转之后,我们便会进一步展开有关三维场景的内容
在三维空间中旋转摄像机
在 摄像机的使用 这节中,我们使用了 rotate() 方法来旋转摄像机
这个方法还有一个参数 axis 即旋转轴,这个参数默认值为 OUT ,在这种情况下我们的摄像机只会在二维平面中旋转
我们如果改变这个参数,便可以在三维空间中旋转摄像机,从而呈现三维画面:
# 画面中的主要元素:一个三维坐标轴以及一个在二维平面内的方形

axes = ThreeDAxes(
    (-4, 4), (-4, 4), (-4, 4),
    axis_config={
        'include_tip': True
    }
)
square = Square()

# 用于演示的箭头和文字

vec1 = Vector(RIGHT, color=YELLOW)
vec2 = Vector(OUT, color=YELLOW)

txt1 = Text('axis=RIGHT', font_size=16, color=YELLOW)
txt1.points.next_to(vec1, UR, buff=SMALL_BUFF)
txt2 = Text('axis=OUT', font_size=16, color=YELLOW)
txt2.points.next_to(vec2, OUT, buff=SMALL_BUFF)

group1 = Group(vec1, txt1)
group2 = Group(vec2, txt2)

# 动画过程

self.show(axes, square)

self.play(FadeIn(group1))
self.play(
    self.camera.anim.points.rotate(30 * DEGREES, axis=RIGHT),
)
self.play(FadeOut(group1))

self.play(FadeIn(group2))
self.play(
    self.camera.anim.points.rotate(40 * DEGREES, axis=OUT),
)
self.play(FadeOut(group2))
参考:
另外,我们还可以使用 absolute=False 来表示基于摄像机自身的坐标系来旋转:
axes = ThreeDAxes(
    (-4, 4), (-4, 4), (-4, 4),
    axis_config={
        'include_tip': True
    }
)
square = Square()

self.show(axes, square)
self.play(
    self.camera.anim.points
        .rotate(30 * DEGREES, axis=RIGHT)
        .rotate(40 * DEGREES, axis=OUT),
    duration=2
)
self.show(FrameRect(self.camera, alpha=0.5))  # 显示当前摄像机的视野框
self.forward(0.5)

# 基于摄像机自身的坐标系来旋转
self.play(
    self.camera.anim.points
        .rotate(20 * DEGREES, absolute=False)
)
self.forward()
参考:
另外,也可以直接通过四元数来指定视野朝向:
axes = ThreeDAxes()
sphere = Sphere().into('checker')
sphere.points.move_to(axes.c2p(3, 2, 2))

self.show(axes, sphere)

self.forward()
self.play(
    self.camera.anim.set(orientation=quat(0.8, 0.2, 0.1, 0.9))
)
参考:
备注
JAnim GUI 也提供了一个方便的功能在预览窗口调整摄像机,可另行参阅 camera 命令 进行了解
三维坐标
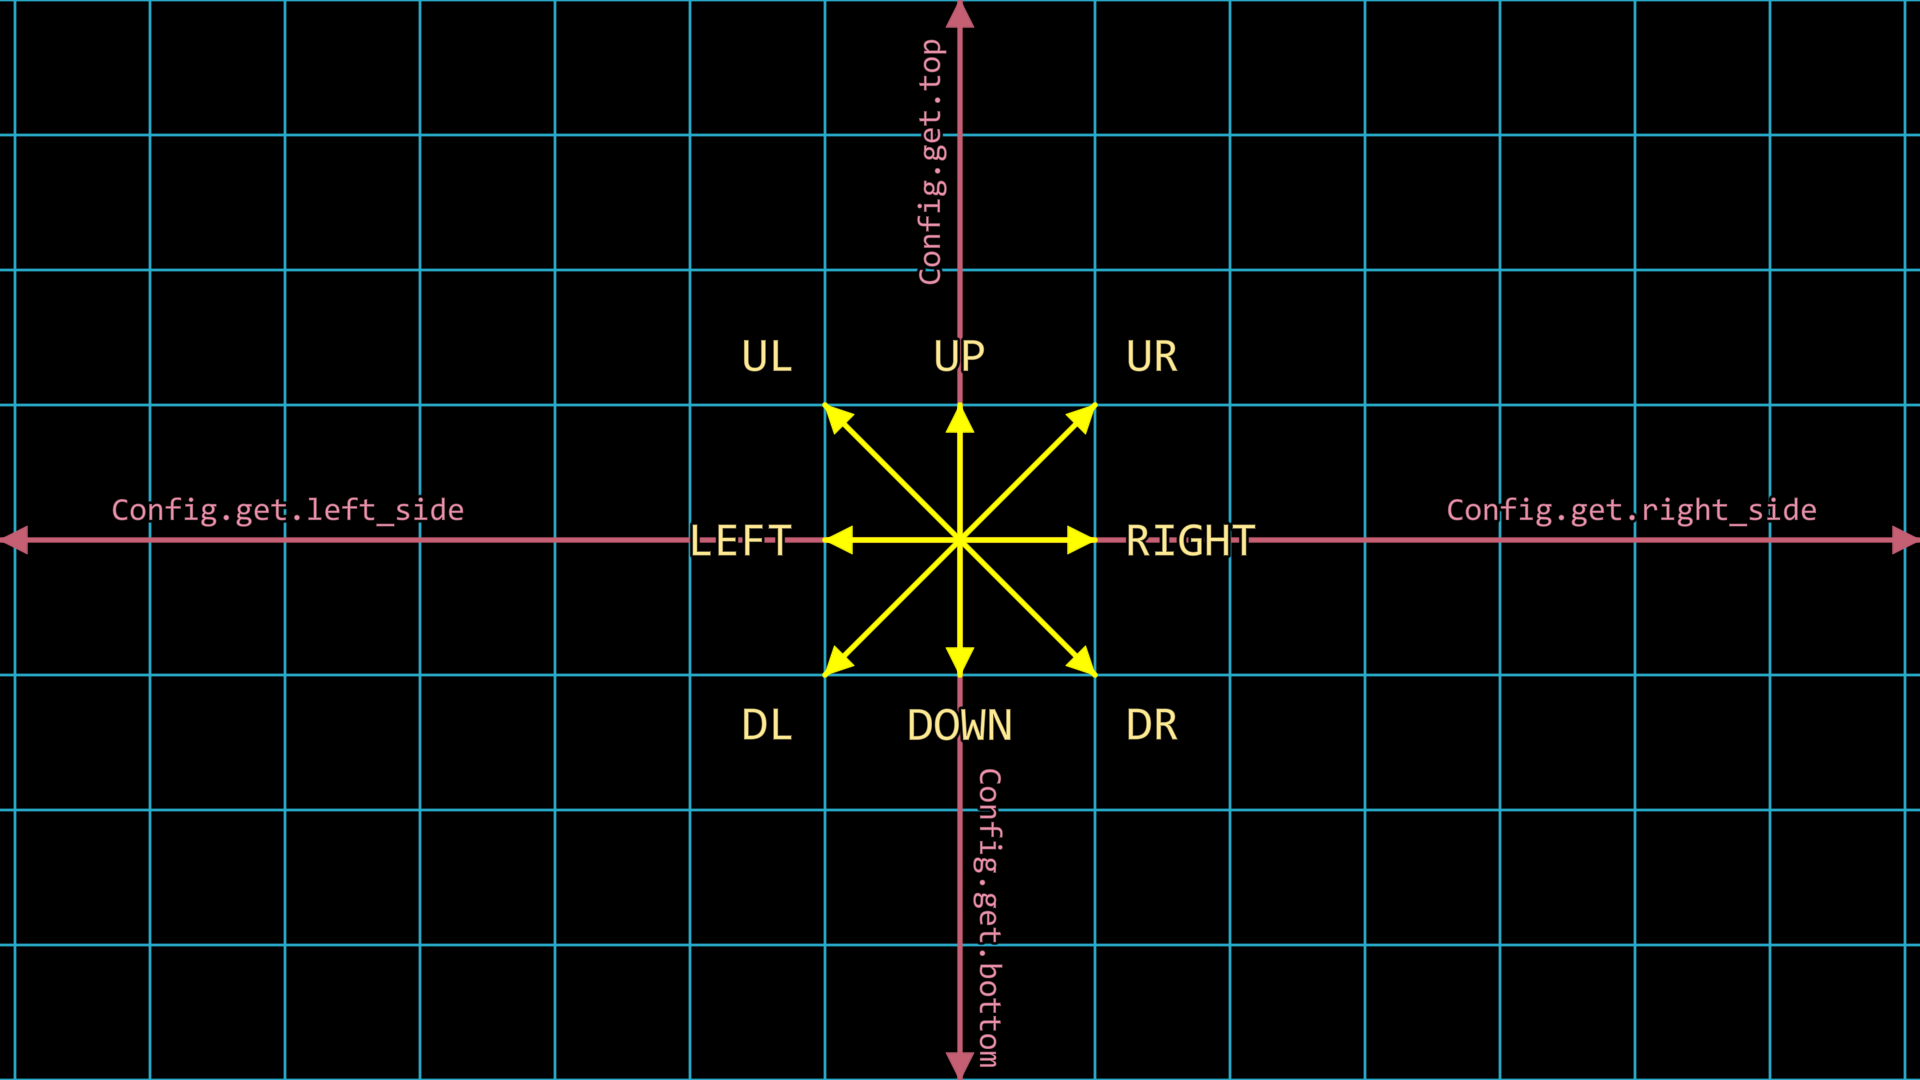
回顾如下的图片,在平面坐标中,我们提及了若干个主要的方向,包括 LEFT 、 RIGHT 、 DOWN 以及 UP
在三维空间中,我们在第三个分量还有两个主要的方向,它们分别是 OUT 和 IN ,分别表示“离开二维平面”(即朝向初始摄像机)以及“深入二维平面”(即远离初始摄像机)的方向,如下图所示:
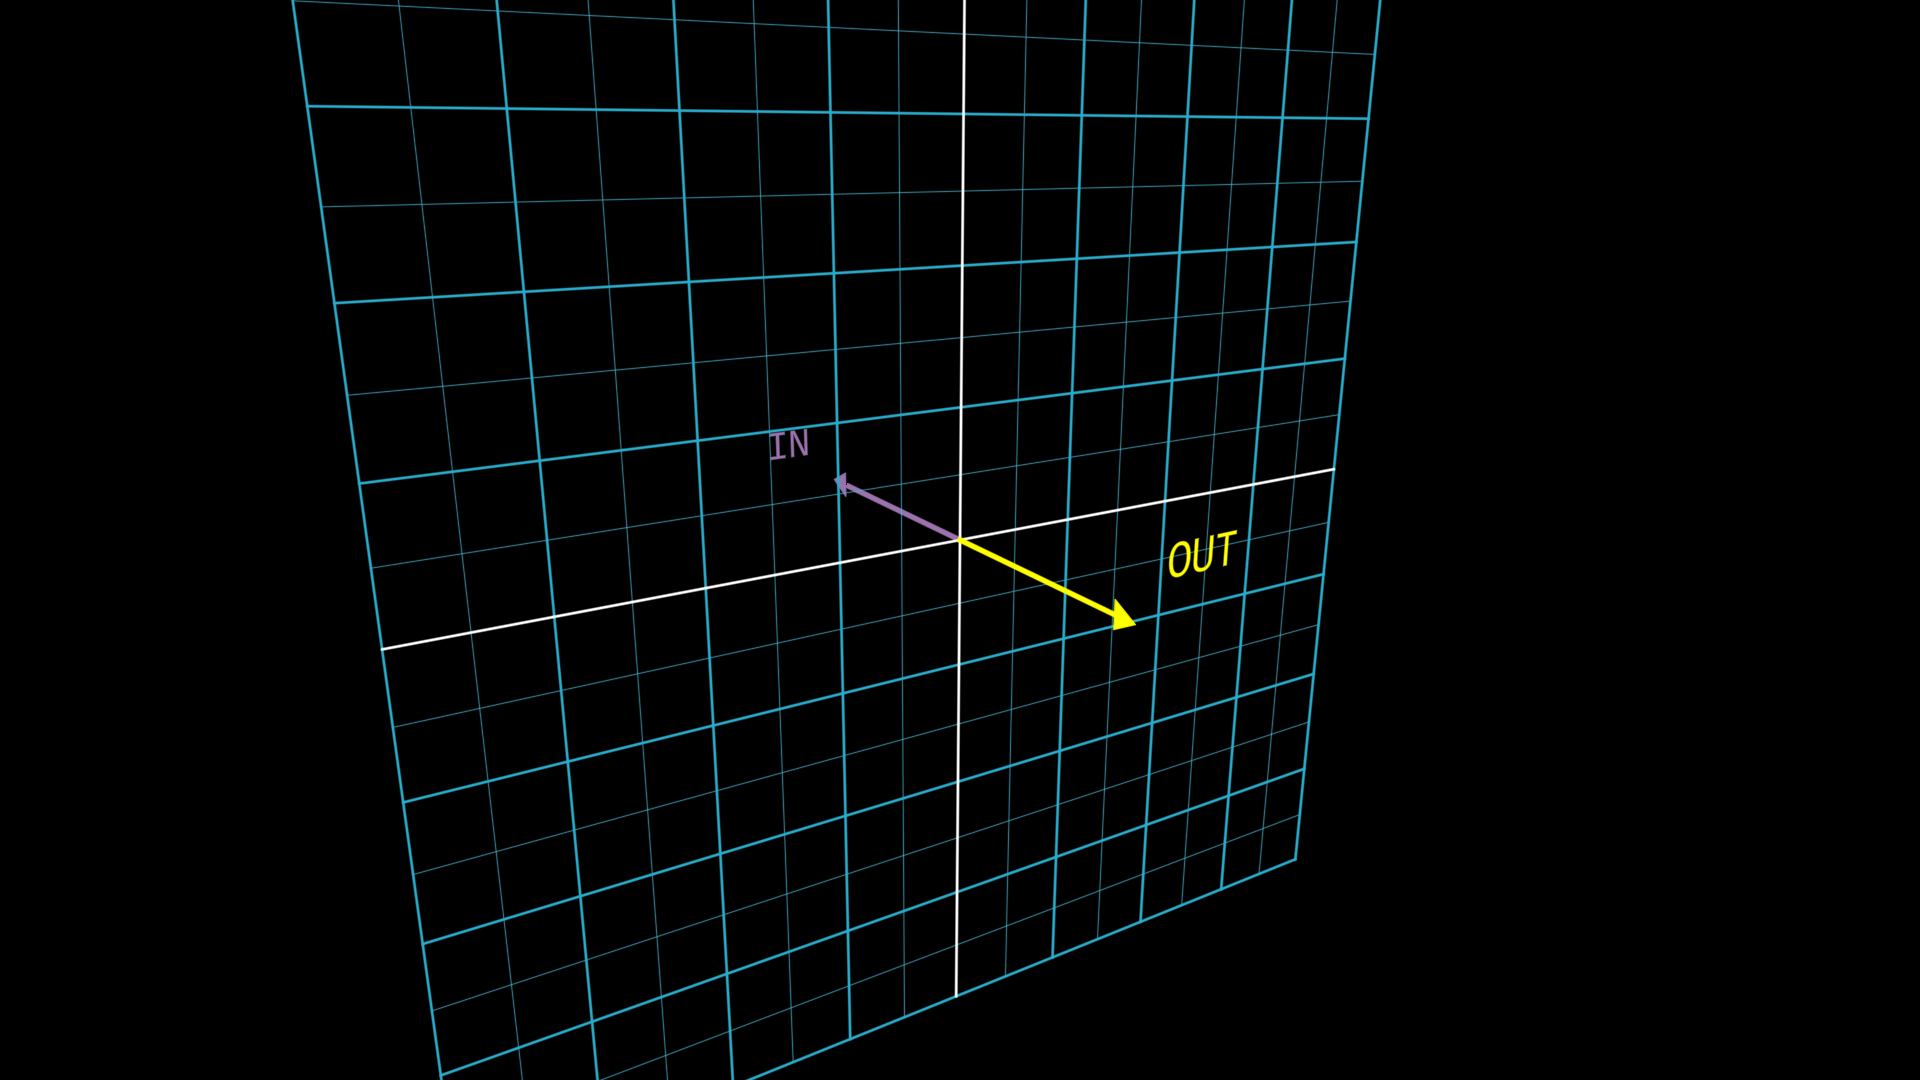
从而,我们可以利用这两个方向在三维空间中移动,当然,也可以在三维空间中旋转
self.camera.points.set(orientation=quat(-0.15, -0.28, -0.04, 0.95))

# 用于辅助观察的坐标系

axes = ThreeDAxes(
    (-3, 3), (-3, 3), (-3, 3),
    axis_config={
        'include_tip': True,
    }
)
axes.z_axis.set(color=MAROON)
labels = axes.get_axis_labels(rotate_xy=False, z_kwargs={'color': MAROON})

# 用于演示的矩形物件

square = Square(color=BLUE, fill_alpha=0.6)

# 动画过程

Group(axes, labels, square).show().apply_depth_test()
self.forward()
self.play(
    square.anim(duration=1.5).points.shift(OUT * 2),
    square.anim(duration=3).points.shift(IN * 4),
    Rotate(square, PI, axis=RIGHT, about_point=ORIGIN, duration=3),
    lag_ratio=1
)
self.forward()
除了使用内置方向表示坐标,还可以直接使用坐标值来表示位置。例如,上面涉及的 .shift(OUT * 2) 等效于 .shift([0, 0, 2]) 。
处理三维遮挡
在默认情况下,JAnim 只会根据物件的 depth 顺序来绘制,但是对于三维空间中物件的遮挡,我们需要一些其它的机制
处理三维空间中遮挡关系的机制可以分为两种:
apply_depth_test(): 深度测试机制渲染时会自动处理启用了该机制的物件的像素级遮挡关系,不渲染已被遮挡的像素,且几乎没有性能损失
具体原理可另行在网络上搜索有关 “深度测试” 或 “深度缓冲” 的内容
apply_distance_sort(): 距离排序机制渲染时会计算启用了该机制的物件各自的中心点离当前摄像机的距离,根据距离排序渲染顺序,会有排序的性能损失
我们需要了解相应机制的优缺点,从而方便选择合适的一种,在考虑优缺点时,我们有两种难点情景需要考虑:
“相交物件” 与 “半透明物件”
演示如下:
class ThreeDOcclusion(Timeline):
    def construct(self) -> None:
        # 初始视角
        self.camera.points.rotate(20 * DEGREES, axis=RIGHT).rotate(35 * DEGREES, axis=OUT)

        # 演示两种策略
        self.demonstrate(depth_test=True, distance_sort=False)
        self.demonstrate(depth_test=False, distance_sort=True)

    def demonstrate(self, depth_test: bool, distance_sort: bool) -> None:
        txt1 = Text(f'{depth_test=}').fix_in_frame()
        txt1.points.next_to(LEFT * 1.5, LEFT)
        txt2 = Text(f'{distance_sort=}').fix_in_frame()
        txt2.points.next_to(RIGHT * 1.5, RIGHT)

        for txt in [txt1, txt2]:
            txt.select_parts('True').set(color=GREEN)
            txt.select_parts('False').set(color=RED)
        self.show(txt1, txt2)

        # 相交物件演示

        s1 = Square(color=RED, fill_alpha=1)
        s2 = Square(color=GREEN, fill_alpha=1)
        s2.points.rotate(PI / 2, axis=RIGHT)
        s3 = Square(color=BLUE, fill_alpha=1)
        s3.points.rotate(PI / 2, axis=UP)

        group = Group(s1, s2, s3)
        group.apply_depth_test(depth_test)
        group.apply_distance_sort(distance_sort)

        self.show(group)
        self.play(self.RotatingCamera(), duration=5)
        self.hide(group)

        # 半透明物件演示

        sphere = Sphere(resolution=12, fill_alpha=0.5).into('vchecker')

        sphere.apply_depth_test(depth_test)
        sphere.apply_distance_sort(distance_sort)

        self.show(sphere)
        self.play(self.RotatingCamera(), duration=5)
        self.hide(sphere)

        self.hide(txt1, txt2)

    def RotatingCamera(self):
        return AnimGroup(
            DataUpdater(
                self.camera,
                lambda data, p: data.points.rotate(TAU * p.alpha, axis=RIGHT),
            ),
            DataUpdater(
                self.camera,
                lambda data, p: data.points.rotate(TAU * p.alpha, axis=OUT),
            ),
        )
可以注意到:
深度测试机制在处理相交物件时表现较好 ,但是处理半透明物件不太好,半透明物件的可见性会受到渲染顺序的影响
并且,如果你仔细观察,可以发现开启深度测试后,有些物件会出现细黑边,这是由于抗锯齿导致边缘像素半透明而产生的
距离排序机制在处理半透明物件时表现较好 ,但是处理相交物件不太好,无法正确处理像素级的遮挡关系
所以你可以想到,最难对付的就是:
“半透明相交物件”
作为不太优雅的解决方法,也许可以考虑手动细分物件表面等,这里不过多讨论